 Bookstore
  Self Service
  Office Apps
Overview
Brookdale’s “SecurePrint” solution, PaperCut for all the Konica Minolta multifunctional printers (MFPs) located on all campuses provides a stable, cost-effective, and secure printing solution. All campus locations use a unique “printer” for that location. The unique device will display in the list of available printers on your Brookdale issued PC or laptop. For example, when printing from a PC or Laptop at Wall, the “Wall_SecurePrint on KONICAPS” will appear in the list of available printers. When you send a document to print from any application on your Brookdale issued computer or laptop (i.e., Word, Excel, PDF, etc.), the document is sent to the “SecurePrint” print queue. You can release and retrieve your document from ANY Konica MFP at your site using your secure personal pin.
Important Note: To send print jobs to the Konica multi-function printers using SecurePrint, you must be logged into Windows as yourself. Follow the steps outlined Log Into PC/Laptop for detailed instructions.
How to..
Select Printer
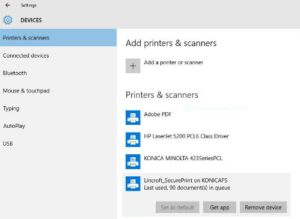
Selecting the SecurePrint Konica Minolta Multifunctional Printer
- Go to Start > Settings > Devices > Printers and Scanners.
- Select the designated SecurePrint device for your location (i.e., Lincroft_SecurePrint on KONICAPS, Wall_SecurePrint on KONICAPS, etc.)
- Optional – To set this device as your default printer, click the device and select “Set as default.”
Release Print
Releasing Documents
You can release and retrieve your document from ANY Konica MFP at your site using your secure personal pin. Secure pins have been sent by email to all faculty and staff members. Enter this secure personal pin using the printer keypad to “Release” your documents. Documents are not automatically printed; once a job is sent, you will physically release them from a Konica MFP.
Follow the steps below to release your document form the SecurePrint queue:
- Tap the ID link from the Login window.
- Enter your personal seven-digit ID. (Note: If you have misplaced you secure print pin, please review the steps outlined below “Retrieving your Pin”)
- Tap OK.
- Confirm your login and tap OK. A message will appear indicating how many documents you have in the network print queue.
- Tap Release.
- Tap the document to print from the list of items in your personal queue.
- Press the “Start” button on the keypad to print the document.
- Press the Access button from the keypad to log out after you have printed your documents.
Copying and Faxing
Copying and Faxing
To copy or fax a document from a network Konica machine you must enter your personal seven-digit print account ID from any Konica machine.
- Tap the ID link from the Login window.
- Enter your personal seven-digit ID.
- Tap OK.
- Confirm your login and tap OK.
- Select the Copy or Fax/Scan options from the machine keypad.
- Press the Access button from the keypad to log out after you have copied, faxed, or scanned your documents.
Retrieving your Print PIN
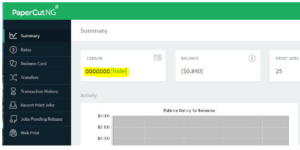
The “SecurePrint” PaperCut printing solution (provided by Konica) includes a web interface to manage and monitor usage as well as review your recent and pending print jobs. Log in to https://secureprint.brookdalecc.edu when on campus using your NetID username and password to review your account information and retrieve your PIN. You can also use the web portal to release pending print jobs and review your print history.
Web Printing
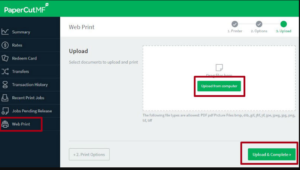
The secure web portal, PaperCut also supports web based printing from all devices ( i.e., computers, laptops, tablets, and mobile phones). You can send PDF documents to the “SecurePrint” print queue via the web portal interface when you are on campus and are connected to the Brookdale wired network or the Brookdale Secure Wireless network.Follow the steps below to upload a PDF file and send to the SecurePrint” queue:
- Log into the SecurePrint – PaperCut web portal: https://secureprint.brookdalecc.edu.
- Enter your NetID username and password
- Select the Web Print link from the left side navigation pane
- Click Submit a Job and
- Click Upload Document (s) (NOTE: Only PDF files are supported via web based printing at this time)
- Click Upload and Complete
You can release and retrieve your document from ANY Konica MFP at your site using your secure personal pin.
NOTE: Brookdale is working on future enhancements that will allow you to print other document types than PDF; specifically, Microsoft Office applications will be able to print via Web Print once these enhancements are built.
Log into PC/Laptop
| 1. Click the Start button>then Log Off | 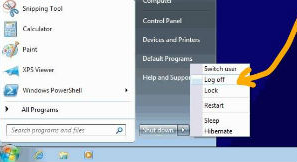 |
| 2. Once you are logged off, press the Ctrl + Alt + Delete keys simultaneously > Click the “Switch User” button (for Winows 7 only)> Click the “Other User” button and login with your Brookdale NetID credentials | 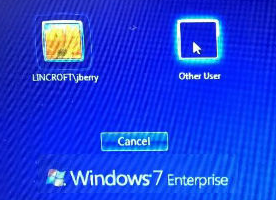 |
| 3. Log off again when you are done using the computer. Also note: if this is a shared use computer, reboot it once you are done and it will automatically login again as the shared user | 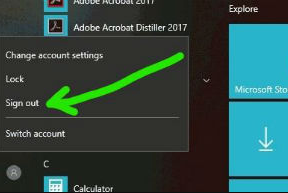 |
Print from a Mac
Step One: Install the PaperCut SecurePrint Application
- Use the steps under the “Single user install” heading in this article: https://www.papercut.com/products/ng/manual/clienttool/topics/user-client-install-mac.html
- On step #4, use this server connection path: smb://KonicaPS.lincroft.ads.brookdalecc.edu/PCClient
- On step #5, login is a Registered User and use the format “lincroft\jsmith” (where jsmith is your username) for your username then enter your password.
Step Two: Add the SecurePrint Printer as a Device on the Mac
- Use the steps under the “Scenario One: My own Mac (single user)” heading in this article: https://www.papercut.com/products/ng/manual/common/topics/install-mac-windows.html
- Skip the “Installation” steps and go to the “Set up the printers” heading
- On step #6, use this server Device URL: smb://username:password@KonicaPS.lincroft.ads.brookdalecc.edu/Lincroft_SecurePrint
- On step #8, select the “Generic Postscript Driver”
- On step #10, the first time you print you will have to enter your username and password one more time. Login is a Registered User and use the format “lincroft\jsmith” (where jsmith is your username) for your username then enter your password. And make sure to click the “Remember my password” information.
